JKOwners Forum banner

DIY HEMI SWAP w/Spreadsheet

35K views 21 replies 12 participants last post by  Old Dogger  
#1 · (Edited)
Some of you know I finished up a Hemi swap on my 2009 JKUR in November. I have since been asked by many for a copy of the spreadsheet I put together. The spreadsheet was put together with the intent of sharing it with those folks interested in the Hemi swap but, like me, may be wondering about all the little aggravating shit that one may have to buy. The nickel and dime factor. Take into consideration I used a complete dropout (engine w/ all accessories, transmission and even the t-case that could be sold) from a 2010 Ram 4x4. By using a transmission (4wd) of this year I did not need to buy the 4wd transmission adapter which saves a few bucks. In addition by using a transmission of this year it was NOT necessary to change out the valve body solenoid. When you are shopping for an engine find the best price with the lowest miles and the most inclusive of parts. Try to get all of the accessories, fuel line, transmission cooling lines, stock harness and comp not necessary but will keep ports closed for storage and debris prevention in harness ports. Again this was done using a truck motor so it may vary from Grand Cherokee/Commander and car engines. Can't imagine it being much different. At the time I did my swap, according to Todd at Jeep Speed Shop, the 2010 transmission was the holy grail. Not sure if getting a newer engine makes any difference. Careful research, shopping and patience are money savers.

The only thing the sheet does not reflect is the $170, in addition to the Flowmaster 50, I had to pay the exhaust guy to do my exhaust. This is country boy prices so it is likely it will be more expensive for some of you. For those of you in my neck of the woods, it is Brads Exhaust in Camden, SC. I don't want to hear any shit from y'all, but I used the stock cats. I went prepared to pay for new ones but the guy, in his 33 years of exp, said he would use the stock ones. So I will until they burn out or whatever. I got a code for catalyst inefficiency once. I tightened the O2 sensors went away and has yet to come back.

Feel free to ask questions. I have also duplicated this thread on JKF and has more pics.
http://www.jk-forum.com/forums/modi.../forums/modified-jk-tech-2/diy-hemi-swap-info-w-spreadsheet-332076/#post4201138
 

Attachments

#2 · (Edited)
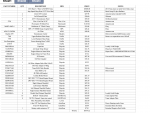
I did quite a bit of research and waited until I had all parts in hand before starting the swap. It took about two months to get everything. I would recommend paying close attention to my spreadsheet because , while not perfect, there are several things on there that are not listed on the JSS BOM sheet that you will need that may cause you a WTF moment along the way. Such as the hump coupler that goes in between the air filter and throttle body. In the time I was waiting I did research and had a couple guys from the forum lined up to answer questions. Do this! JSS is a small understaffed outfit so be prepared to wait for answers you could get from a forum member. There are a shitpile of videos on YouTube that you can get good info from even if it is not necessarily relative to the subject of the video. While I am thinking, I would highly recommend baggies and sharpie to keep track of parts removed. Also take pictures for future reference. Also this thread is not to be anything but helpful to anyone,especially those like me, with little to no mechanical experience.

This swap can be achieved with a basic set of hand tools, wrenches, ratchets and sockets. A 10mm, 13mm, 15mm and an 18mm will get you pretty far. Specialty tools needed: angle grinder, Dremel, Die Grinder useful, fuel line disconnect tool, a pipe cutter also valuable but not imperative. Large screwdriver or pry bar. And a welder or person that can weld. Engine hoist or a lift. And believe it or not a long weekend.

I took the body off approach, which having done it that way, is the only way. Obviously it can be done body on. Motech has a couple of good videos regarding preparation of body for removal on YouTube. May take a couple hours. The body was removed and replaced without opening the brake/ABS system. Simply unbolt the Master Cylinder from booster. For body replacement you will need to remove the tray on which the ABS module and PCM mount. Once body is back on you can slide the tray under everything. When body was removed we just set it on a utility trailer and parked it under a shed. Once the body was removed that is when I removed the radiator and all that shit.

Pic to how I secured ABS without opening and taking body off.
http://www.jk-forum.com/forums/attachment.php?attachmentid=643092&d=1460051166

TIP. If you remove body. Use a plumb bob to help realign. The two studs on the front of the body if aligned will pretty much guarantee the rest will jive.

PREPARING THE MOTOR.
I would recommend holding on to the 3.8 because, in my case and likely yours, there will be a few parts to save. Like maybe an AC line, fuel return line, Evan canister, power steering pump or the fittings and the rubber transmission mount. JK pump can be used but in my case it appeared the pulley was going to hit Steering box. If it works for you drill out the mounting threads. I used the Hemi pump with smaller pulley and removed the fittings fro JK pump. I had to trash the pulley on JK pump to get fittings. The elbow can be removed by carefully twisting back and forth with and adjustable wrench. The brass fitting is 7/8", I believe.

Fittings needed from JK POwer Steering Pump
http://www.jk-forum.com/forums/attachment.php?attachmentid=643096&d=1460053467

VIDEO: POWER STEERING PUMP

EXHAUST MANIFOLDS. East coasters be prepared to replace exhaust manifold studs, especially the doubles. Two broke off for me. Consider PB Blaster a while before attempting to remove.

EXHAUST: as I said before I am using two stock JK cats with no issues at all. And I will until they don't perform any longer. As far as O2 sensors go, you can definitely use the stock downstream/rear sensor. I know of someone using all stock JK sensors with no issues. I ordered 2 new O2 sensors as listed on the spreadsheet.

The CAPACITOR mounts on the aft end of the drivers side head. It will be obvious where it goes. And don't forget your two grounds on the rear of the heads.

WIRING HARNESS. The wiring harness is easy. Find a component or two that you are certain what it is and start there. The rest will kind of let you know where it goes. Length dictates.
NOTE: Apparently there are two different types of connector/harness patterns for the Intake Air Temp Sensor. So you may want to figure out which you have so they can make it to use your JK sensor or you can just get another for $15 off beat. If not they just kind of guess which you have.

Difference in harness patterns
http://www.jk-forum.com/forums/attachment.php?attachmentid=642636&d=1459690915

NOTE: Also there are a couple different types of THROTTLE BODIES. First type is 2012 and below with an 85mm bore it appears, with a part code of 53032801AC, 6 pin (3 pin wide)harness. The second, 2013 and newer, with a part number of 53034251AB which I believe is an 87mm bore Throttle body. It has a single row harness 6 pins wide.
Newer Throttle Body
http://www.jk-forum.com/forums/attachment.php?attachmentid=642635&d=1459690279

It will be necessary to repin the C3 harness that will remain attached to body. HOTWIRE AUTO has a great set of instructions for this procedure.
Repinning Instructions
http://www.jk-forum.com/forums/attachment.php?attachmentid=644345&d=1461160730

FAN and CLUTCH If you use the 18" fan it will hit some accessories. So once the fan and clutch are installed just bend the blades back a 1/4". Also on the intake manifold there is a point that sticks out towards the front about an 1.5". Cut it off.

BATTERY/STARTER CABLES. You will at least need to extend the ground or you could make some about 12-18" longer.
That's all I can think of on the engine.

OIL FILTER ADAPTER. After removing the old oil filter stud buy welding a nut or I swear it could be removed with a gigantic Allen wrench. When installing the new adapter make sure the new gasket it not twisted offset. And just bolt on. It may seem like it will be in the way looking ahead but it all will fit. TERAFLEX GUYS WITH FRAME BRACE. Have a bend put it to clear the adapter or just leave brace bar off. I spoke to Dennis about this.

You may end up with two oil sensors. I left both and use one. Taped off the one not in use

NOTE: I have heard of an instance where a guy upgraded to a front Dana 60 and there were potential clearance issues. I believe he ended up doing a remote oil filter setup. I do not know how much lift he had.

BATTERY TRAY/BOX . Fairly straight forward. One wire bundle will kind of be around the top and one will be under the tray. Rubicon guys, the locker relays that are in the back passenger corner of the battery tray will likely need to be repositioned to the top of the passenger side fender just a few inches forward from its original position.

My battery ended up being in the rearward position due to short cables with negative side toward pass fender. Make sure you trim the stands at the firewall.

NOTE. when installing the TIPM to the new mount and have to remove any of the harnesses. Make sure you use care releasing the locks as they may be brittle. And also label which ones are which. I stared at some pics quite a while getting them in order. The Air Filter adapter will ATTACH TO THE BATTERY BOX so before bolting the TIPM mount to the battery tray, bolt the AIR FILTER ADAPTER to the battery box.

BATTERY TRAY INSTALL

AIR FILTER ADAPTER: I would recommend bolting the air filter adapter prior to mounting the TIPM for accessibility issues. I Persoanlly tightened it to where I could still, with a bit of force, adjust the position a bit. The air filter is a tight fit. Be sure to install the hump hose and T-clamps in between the Throttle Body and Air Filter Adapter.
 
#3 · (Edited)
RESOURCES

COOLANT BOTTLE That can be a tight fit but will slide in the slots on the air filter adapter. One guy I know used a heat gun to reshape hit bottle a little.

TRANNY/POWER STEERING COOLER. I am using a B&M tranny cooler and used the cooler in the new radiator for power steering fluid. Just double clamped the rubber hose to metal tube connections. Holds up fine.
NOTE: When using ratcheting clamps make sure you position them considering access in the future. Or you can obviously do the flaring method. The stock 545RFE transmission lines can be used so do not throw them away if you have them.

MOTOR MOUNTS AND MOUNTING. Once the old mounts are removed from frame the new ones are no brainer to line up and weld. You can use stock JK bolts for mounts. I bought new. On the rubber engine mounts (Grand Cherokee) it was said to install with labels up. In my case this was incorrect. It put the tail of the transmission about 20 degrees off. So I flipped the passenger side over. All good. I know of one other guy that this tip saved him some aggravation

RUBBER MOTOR MOUNTS

WELD IN ENGINE MOUNTS

TRANSMISSION/XFER CASE MOUNTING: Before mounting the flat adapter plate be sure to tighten all the XFER case mounting nuts or you will have to take the adapter off. Ask me how I know. The plate with the bend is used as a support and will install on the bottom side of the crossmember. The point where the flat adapter and the adapter with the bend intersect, taxi weld. In order for the XFER case shift bracket to line up you WILL HAVE TO NOTCH A RIB on the transmission. It will be obvious. In the end all of my shift cables lacked the need of adjustment. I just popped them all back on as is. It would also be a good idea to extend the breather lines on the new transmission and your XFER case.

VIDEO: Transmission adapters

FUEL LINE ADAPTER. Just tighten it up and it will be apparent how and where it goes on the forward portion of the fuel tank to engine fuel line.

The FUEL LINE ADAPTER is in Blue. Also in this pic is the 4WD adapter on the rear of the transmission.
http://www.jk-forum.com/forums/attachment.php?attachmentid=643093&d=1460051942

AC LINES. Pretty much self explanatory. I know of one guy who has not gotten his squared away yet but he uses a Grand Cherokee motor. Not sure what the deal is with that. Again I used a TRUCK motor.

POWER STEERING LINES. If I remember correctly the pressure line I kind of wrapped around the steering box. They are kind of a bitch.
There will be a supplied braxket in the kit to relocate the fluid reservoir. Mine was for a different motor but it was cut and modified.
NOTE:If you think down the line you will want to do hydro assist, now is the time. It will be a hassle if you wait because everything looks to be in the way of removing your steering box.

STEERING ADAPTER PLATE.
The steering shaft will need to be moved over approx 1/2" so it will not make contact with the head. Just use a die grinder or something to make the hole bigger. The adapter plate will work on either side of firewall. The 2007-2010 the pillow bearing is on the inside of the firewall so that is where you will need to mount th adapter plate. On the 2011 and up the pillow bearing is on the outside of the firewall, therefor the adapter plate will go on the outside. If you mount on the outside you will also need to trim the studs. Make sure you strap the steering wheel to prevent movement.

This is about all I can think of at this point. I will add as I recall. In the end you might have 3/4" of space between fan clutch and radiator, 3/4" of space between firewall and the heads. So if it looks like it is gonna be tight during the process, it's because it will.

INSTALLATION REFERENCE
A great reference that will assist, but not geared towards the JSS kit specifically.

http://www.aev-conversions.com/isheets/HEMI_Isheets/AEV_JK_HEMI_Installation_Guide.pdf

VIDEOS. Mainly used for body removal reference and other views


http://jeepspeedshop.com/jk-vvt-57l-truck-hemi-kit-1.html
Some good vids to the left of the page

BUILD THREADS. All offer some good info

http://www.jkowners.com/forum/showthread.php?t=266114

http://www.jkowners.com/forum/showthread.php?t=59384

http://www.jkowners.com/forum/showthread.php?t=16706

http://www.jkowners.com/forum/showthread.php?t=49201

https://www.jk-forum.com/forums/modified-jk-tech-2/trigger-pulled-jss-hemi-swap-334638/

ENGINE AND TRANSMISSION SOURCES
Craigslist.com . Found mine on there

Car-part.com

Greenleafprime on eBay. Not the cheapest but typically have some low mileage stuff

Moparparsdeals.com

Steve White motors in Boone, NC. I know a guy that got a bitchin deal on a crate 6.4. Like a couple -$3k cheaper than his local Florida dealer.
 
#11 ·
Nice job el capitan, that right there is a ton of effort to log and post all that. I may be doing another hemi swap for a friend and I'll think I'll try your route for her seeing as it's half the cost of what I spent on getting the 6.4 in...

As far as the oil filter stud, the inside is a 12mm allen wrench. I got one at napa for 6$.

I agree with the body off idea. While you might lose a day taking it off and re installing I believe it's a higher quality way to do it and in my case it led to stripping everything down to bare metal and painting or replacing so it's a like new chassis but at the very least it allows you to service a bunch of bits that are normally not serviced. I hung two electric winches in my attic and using the remotes, tilted the nose down 5" lower than the back which allowed the front studs to align the body. Piece of cake.

I'm ready for another. lol.
 
#14 · (Edited)
So far it's been a year and a half since the swap. No issues with the engine or transmission. I am happy and still grin with every start. I did have to replace the radiator last month. Which brings up another point.

One way to save a few hundred bucks on a Hemi swap is to buy the radiator separately from the swap kit. I paid about $700 for the radiator in the kit but if you buy separately one can be had for less than $400 shipped from SUMMIT RACING PART# SUM380467. The one I actually got with the kit can be had for less than $400 as well (Northern).
 
#15 ·
So far it's been a year and a half since the swap. No issues with the engine or transmission. I am happy and still grin with every start. I did have to replace the radiator last month. Which brings up another point.

One way to save a few hundred bucks on a Hemi swap is to buy the radiator separately from the swap kit. I paid about $700 for the radiator in the kit but if you buy separately one can Ben had for less than $400 shipped from Summit Racing PART# SUM380467. The one I actually got with the kit can be had for less than $400 as well (Northern).
Glad to hear... I just had the trans in my '12 JK rebuilt and 37s with 4.88s installed. I was thinking of slowly gathering the parts and doing a LS swap in a year. But after dripping the coin on the transmission and having to do a water pump radiator on the wife's '11 Ram 5.7 Hemi 4x4 I thought about doing a Hemi. Both vehicles using the same engine would keep working on them easy.
 
#18 ·
It was the radiator from JSS leaked. It appeared to be leaking from the area of the fins. About 2" from passenger side almost half up from bottom. i just went ahead and replaced it. I did not check the voltage. I think I make get a radiator cap with the zinc anode. The radiator from JSS was a Northern branded one. I have been reading of some of the LS guys going through this shit too. I know of another Hemi guy recently that replaced his.
 
#20 ·
Well you will start getting parts of your kit after about 1.5-2 months. He can be frustrating but everything worked out just like he said. I am still happy with his kit.
I just looked on RCR's site and did not see a radiator listed for JK's. I was told at the time of my purchase a guy in NC was building them.

I am gonna add another useful thread.

https://www.jk-forum.com/forums/modified-jk-tech-2/trigger-pulled-jss-hemi-swap-334638/
 
#21 ·
This is a great thread. I'm putting together my swap now. I'm currently removing a 2012 Ram 1500 with the 65RFE out for the swap. I was reading the radiator comments and was really considering going with another radiator. JSS wants $1000 now for that radiator. Why do that when you can buy a Mushimoto for around $800? That Mushimoto is designed for the 5.7 JK swap as well. Doesn't make sense not to have a lifetime warranty on it for that price as well. I may just get the trans and PS cooler as well from them. Speaking of PS, anyone see a problem with using the stock Ram PS pump? it pumps almost as much as the PSC pump and would work well with the PSC Big Bore steering box I'm also looking into. Thought? Comments?