(I posted this on another forum last Spring and thought this group might like this write-up as well since it getting to be about that time of year to start thinking about hard top removal)
...
Well the temperature is warming up so it's that time of year to take the hardtop off on my 4door JK Rubicon. My goal was to create a hardtop hoist/storage system that was easy to use and could be done by one person. Here's how it went ...
I used a two step approach first lifting the top up to my garage ceiling using hoist bar and hand winch. Once the top was up to the ceiling I lowered it onto a suspended wood shelf.
Hoist Parts:
----------------
10' Channel Strut (Home Depot "SuperStrut" or B-Line B22 Channel; see www.b-line.com for catalog) (qty: 1)
5 hole t-gusset plate (see www.b-line.com for catalog, part #B532 - used to join the two pieces of strut to form the "T") (qty: 1)
Channel nuts/bolts (qty: 9)
Channel end caps (qty: 3)
Channel washers (2-holes qty=3)
Channel washers (1-hole qty=1)
1/2" x 3" eye bolt (qty: 1)
Brake Winch (Dutton Lainson 800 lb brake winch - try Amazon, NorthernTool, Tractor Supply)
3/8" nylon rope (50' length)
2" Block and Tackle set (search google for "National 2" Block and Tackle") (qty: 1)
2" swivel pulley (qty: 1)
quick links (qty: 2)
lag screws (qty: 20 or so)
3/8" square U-bolts (3" inside width x 7.5" tall) (qty: 3)
3/8" vinyl tubing (qty: 2 feet)
36" slotted angle (qty: 2)
foam rubber pipe insulation ( 1 - 7' length)
Shelf Parts:
------------------
60" slotted angle (qty: 4)
1/2" x 6" eye bolts/washers/nuts (qty: 4)
safety snaps (qty: 8)
1/2" or thicker plywood (cut to 75"x48")
2"x3"x8' lumber (5 pieces)
5/16" grade chain (4 - 5' lengths depending ceiling height)
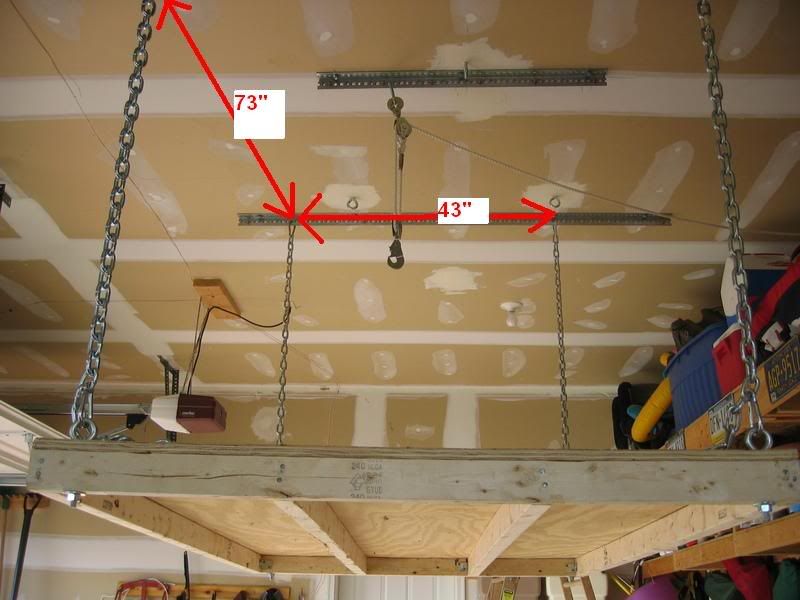
I used slotted angle screwed into the ceiling joist for support instead of using single eye bolts to connect the hoist pulley and shelf chains. This helped spread the weight of the load across several ceiling joists. This may have been overkill but I wanted it sturdy and safe.
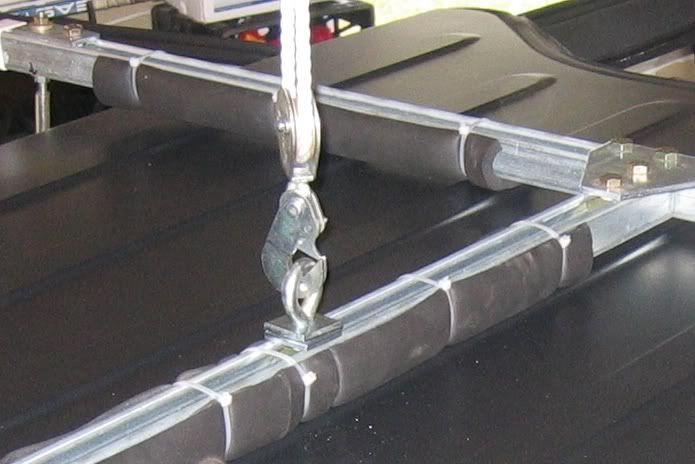
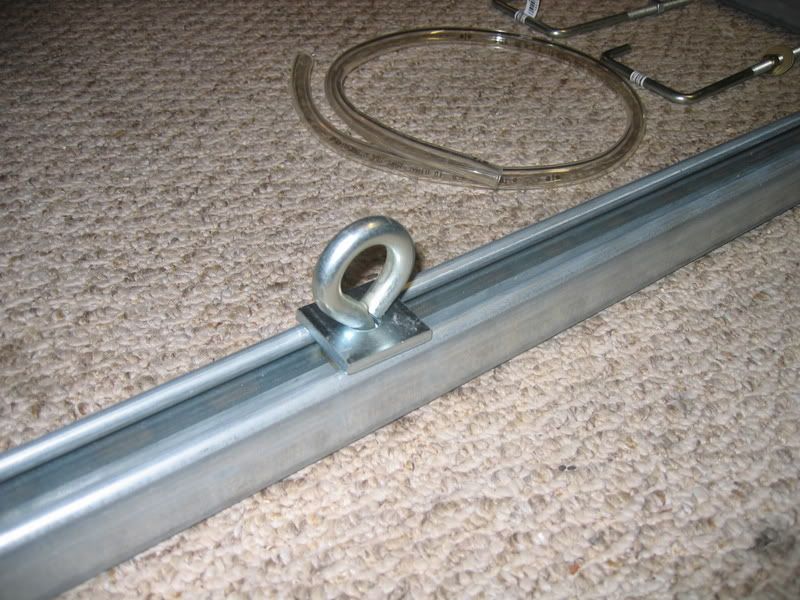
Home Depot sells the Channel Strut I used for the hoist bar but sells very few fittings to connect the pieces to form the "T" so I ended up ordering the channel strut and fitting from a local electrical supply shop. First I built the Hoist Bar as shown below by cutting the 10' length into two pieces 44" and 68". I then connected the two pieces using the 5-hole T-gusset plate as shown below.
![Image]()
then inserted the eye bolt using a channel nut. The nice thing about the channel nut is they can be loosed and easily slide along the channel which was helpful when finding the balance point of the hardtop. (on the 4-door hardtop the balance point for the eye bolt ended up being 20 1/4" from the T connection)
![Image]()
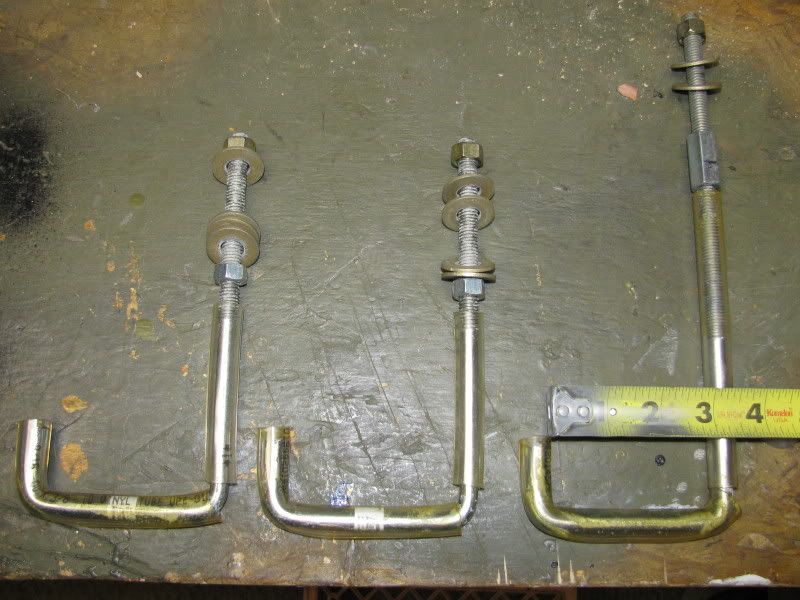
As you can see in the first image, the hooks used were made from U-bolts by cutting off one end and covering them in 3/8" vinyl tubing.
After wrapping the hoist bar in foam rubber pipe insulation to avoid scratching the top, the next step was to lay the hoist bar onto the hardtop and connect the hooks.
![Image]()
Once the hooks are in place and tightened it's time to lower the rope and hoist the top. The brake winch made this task a lot easier:
![Image]()
![Image]()
![Image]()
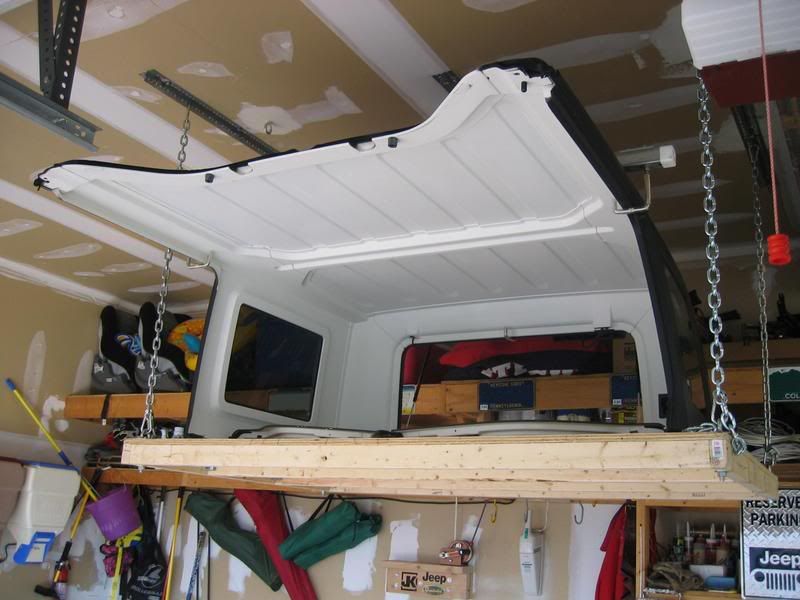
Notice the chains that are hanging and pulled to the side...Once the top is raised I lower the chains and connect the shelf by hooking the chain to the eye bolts on the shelf one side at a time ...
![Image]()
![Image]()
Once the shelf was raised I lowered the top just a few inches onto the shelf.
![Image]()
The shelf then make a great storage spot for the Freedom Top panels as well ...
![Image]()
All in all I spend around $150 to build the hoist including the hand winch. The shelf was around another $90 for the wood and hardware. That's it, now the soft top is on and I'm ready for summer !!!
...
Well the temperature is warming up so it's that time of year to take the hardtop off on my 4door JK Rubicon. My goal was to create a hardtop hoist/storage system that was easy to use and could be done by one person. Here's how it went ...
I used a two step approach first lifting the top up to my garage ceiling using hoist bar and hand winch. Once the top was up to the ceiling I lowered it onto a suspended wood shelf.
Hoist Parts:
----------------
10' Channel Strut (Home Depot "SuperStrut" or B-Line B22 Channel; see www.b-line.com for catalog) (qty: 1)
5 hole t-gusset plate (see www.b-line.com for catalog, part #B532 - used to join the two pieces of strut to form the "T") (qty: 1)
Channel nuts/bolts (qty: 9)
Channel end caps (qty: 3)
Channel washers (2-holes qty=3)
Channel washers (1-hole qty=1)
1/2" x 3" eye bolt (qty: 1)
Brake Winch (Dutton Lainson 800 lb brake winch - try Amazon, NorthernTool, Tractor Supply)
3/8" nylon rope (50' length)
2" Block and Tackle set (search google for "National 2" Block and Tackle") (qty: 1)
2" swivel pulley (qty: 1)
quick links (qty: 2)
lag screws (qty: 20 or so)
3/8" square U-bolts (3" inside width x 7.5" tall) (qty: 3)
3/8" vinyl tubing (qty: 2 feet)
36" slotted angle (qty: 2)
foam rubber pipe insulation ( 1 - 7' length)
Shelf Parts:
------------------
60" slotted angle (qty: 4)
1/2" x 6" eye bolts/washers/nuts (qty: 4)
safety snaps (qty: 8)
1/2" or thicker plywood (cut to 75"x48")
2"x3"x8' lumber (5 pieces)
5/16" grade chain (4 - 5' lengths depending ceiling height)
I used slotted angle screwed into the ceiling joist for support instead of using single eye bolts to connect the hoist pulley and shelf chains. This helped spread the weight of the load across several ceiling joists. This may have been overkill but I wanted it sturdy and safe.
Home Depot sells the Channel Strut I used for the hoist bar but sells very few fittings to connect the pieces to form the "T" so I ended up ordering the channel strut and fitting from a local electrical supply shop. First I built the Hoist Bar as shown below by cutting the 10' length into two pieces 44" and 68". I then connected the two pieces using the 5-hole T-gusset plate as shown below.
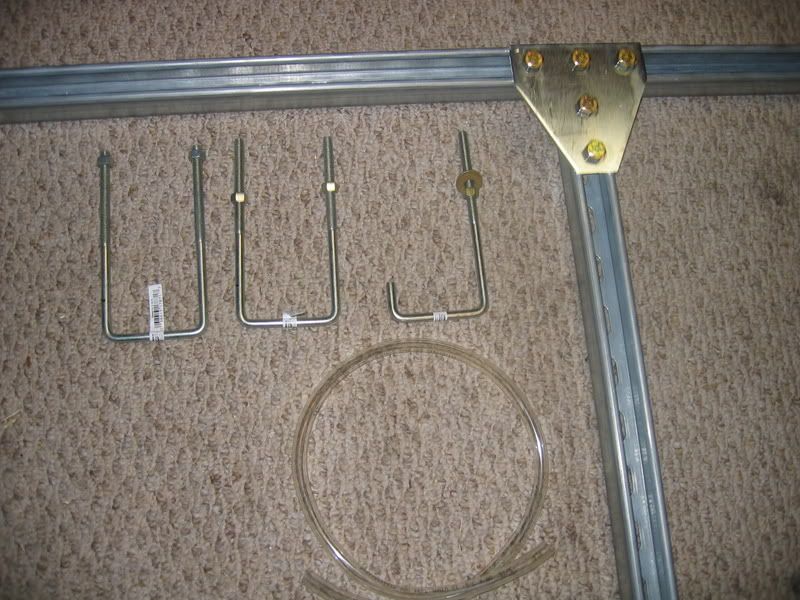
then inserted the eye bolt using a channel nut. The nice thing about the channel nut is they can be loosed and easily slide along the channel which was helpful when finding the balance point of the hardtop. (on the 4-door hardtop the balance point for the eye bolt ended up being 20 1/4" from the T connection)
As you can see in the first image, the hooks used were made from U-bolts by cutting off one end and covering them in 3/8" vinyl tubing.
After wrapping the hoist bar in foam rubber pipe insulation to avoid scratching the top, the next step was to lay the hoist bar onto the hardtop and connect the hooks.
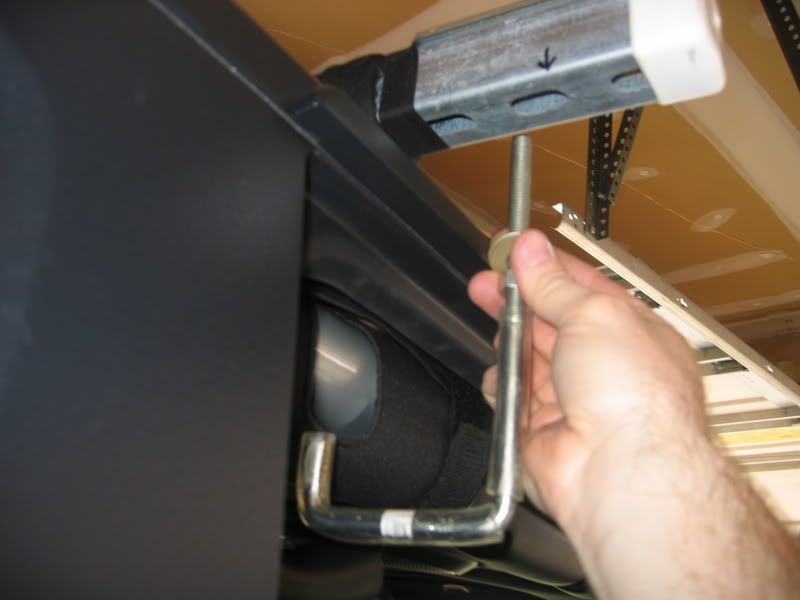
Once the hooks are in place and tightened it's time to lower the rope and hoist the top. The brake winch made this task a lot easier:


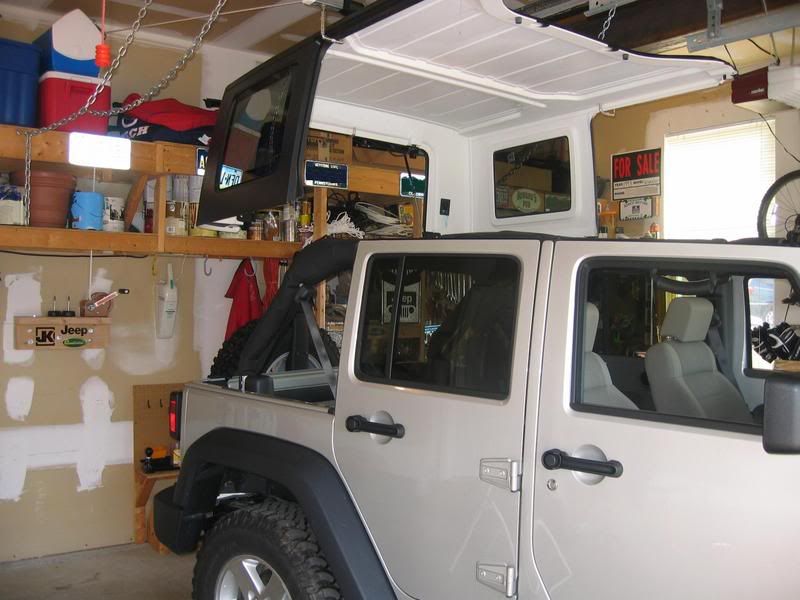
Notice the chains that are hanging and pulled to the side...Once the top is raised I lower the chains and connect the shelf by hooking the chain to the eye bolts on the shelf one side at a time ...
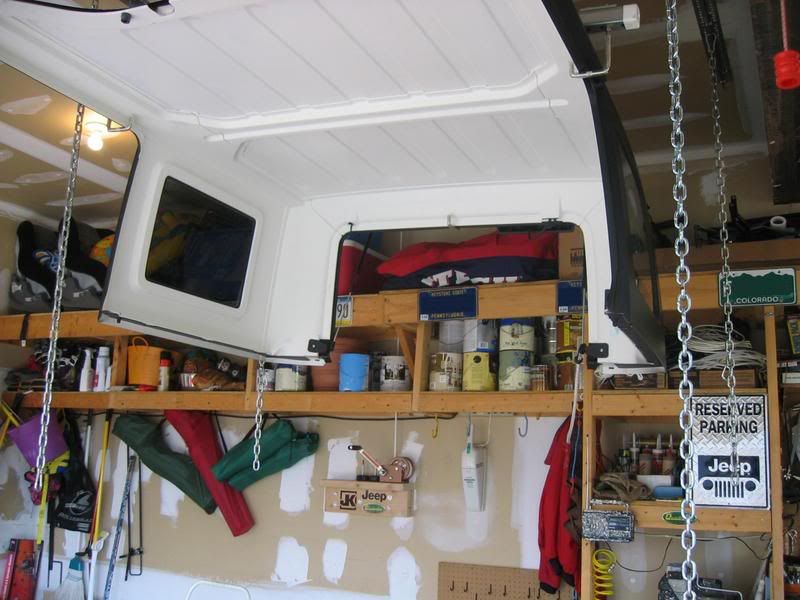
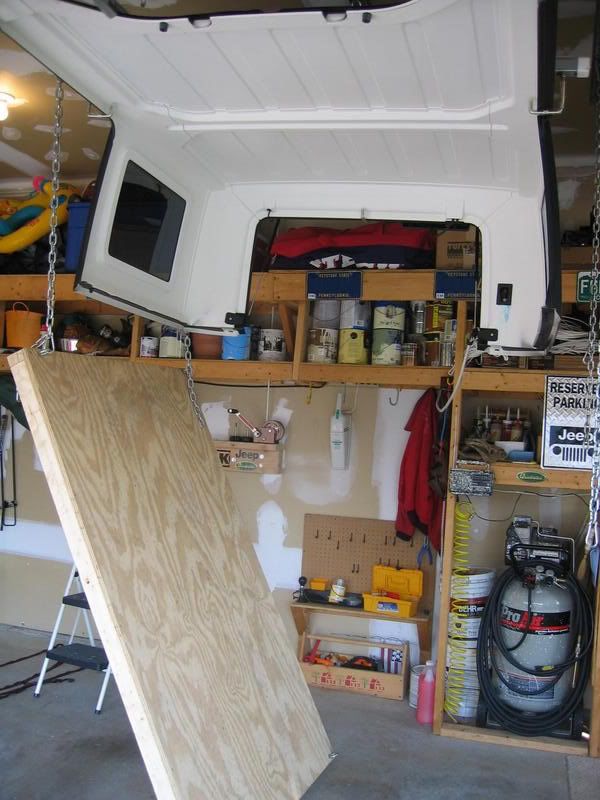
Once the shelf was raised I lowered the top just a few inches onto the shelf.
The shelf then make a great storage spot for the Freedom Top panels as well ...
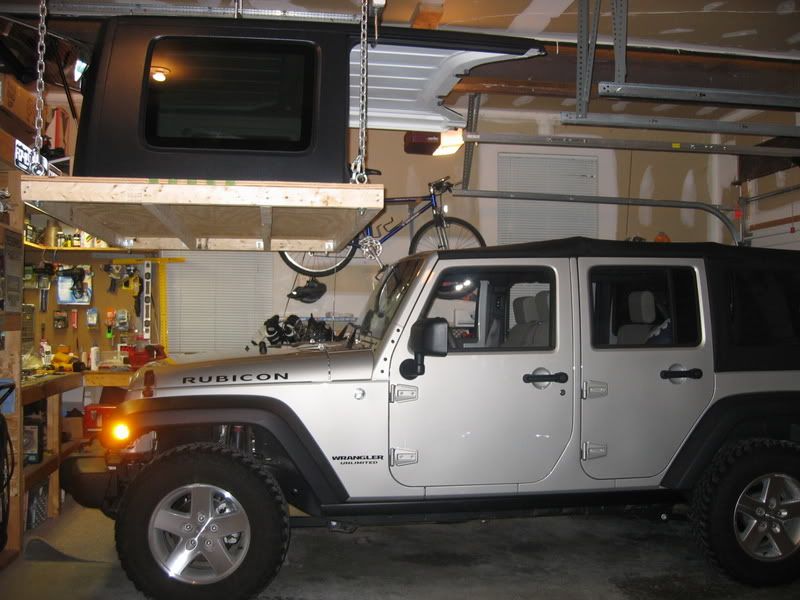
All in all I spend around $150 to build the hoist including the hand winch. The shelf was around another $90 for the wood and hardware. That's it, now the soft top is on and I'm ready for summer !!!
")